Getting Started with Your Oculus Rift DK2: A Comprehensive Setup Guide

So, you just got your hands on an Oculus Rift DK2? Awesome! Getting this cool piece of tech up and running might seem a little tricky at first, but don’t worry, it’s totally doable. This guide will walk you through everything, from the moment you open the box to launching your first virtual world. We’ll cover all the important steps to make sure your DK2 experience is smooth and fun. Let’s get started!
Key Takeaways
- Always check the box to make sure all parts are there and read the safety stuff first.
- You’ll need to download the Oculus software, especially the Runtime, to get things going.
- Setting up the display is a big deal; you’ll want to make the Oculus your main screen and adjust its settings.
- Hooking up the cables correctly and making sure the sensors are clear is super important for the headset to work.
- For Mac users, paying attention to your graphics card and how you manage other monitors can really help with performance.
Unboxing Your Oculus Rift DK2
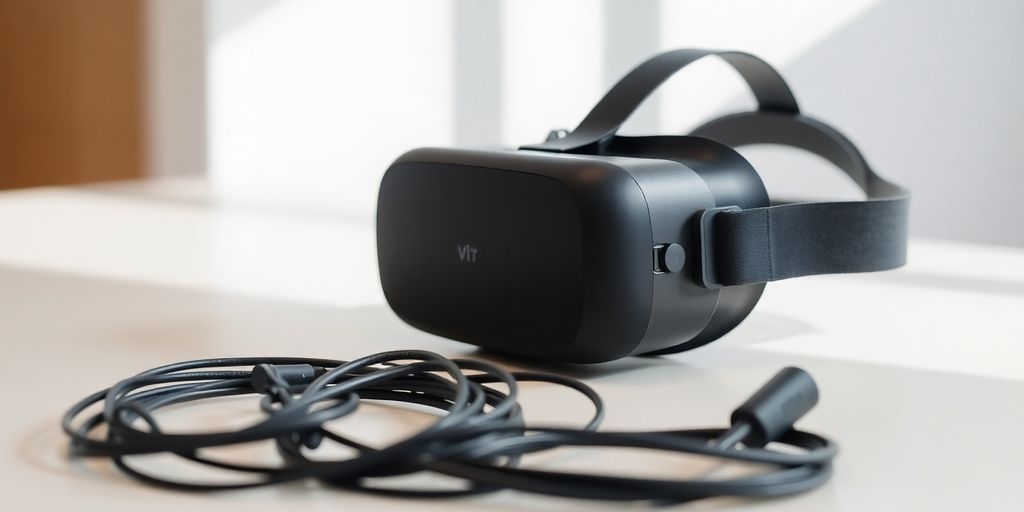
Alright, so you’ve finally got your hands on the Oculus Rift DK2! Exciting times ahead. Let’s get this thing unboxed and ready to go. It’s not rocket science, but a little care goes a long way.
Carefully Remove Contents
First things first, find a good, clear workspace. You don’t want to be fumbling around with expensive tech on a cluttered desk. Open the box carefully. No need to go all Hulk on it. Gently lift out each component, taking note of how it’s packed. This is useful if you ever need to repack it for storage or transport. Be mindful of static electricity, especially if you’re in a dry environment. Maybe touch a grounded metal object before you start handling the electronics.
Verify All Items Are Present
Okay, now for the checklist. Make sure you have everything that’s supposed to be in the box. This usually includes:
- The Oculus Rift DK2 headset itself
- A cable to connect the headset to your computer
- The external camera for positional tracking
- A power adapter for the camera
- Different lenses (A, B, C) to adjust for your vision
If anything is missing, don’t panic! Contact Oculus support. They’re usually pretty good about sorting things out. It’s better to catch it now than halfway through the setup process. Also, it’s a good idea to keep the box and packaging materials for a while, just in case you need to return or exchange anything. If you are having issues with the frame rate, you may need to use adb commands.
Review Safety Warnings
Seriously, don’t skip this step. I know, reading manuals is boring, but those safety warnings are there for a reason. They’ll tell you about potential risks, like motion sickness, eye strain, and even seizures in rare cases. Pay attention to the recommended usage guidelines and take breaks often. Your eyes (and your brain) will thank you. Plus, there might be important info about cleaning and maintaining the headset to keep it in good condition.
It’s easy to get caught up in the excitement of VR, but remember to be responsible. Don’t use the headset while driving, operating heavy machinery, or doing anything else that requires your full attention. And if you start feeling unwell, stop immediately. VR is awesome, but safety comes first.
Essential Software Installation
Alright, let’s get the software side of things sorted out. You can’t just plug in the DK2 and expect magic to happen. You’ll need to install some software to make it work correctly. It’s not too bad, I promise!
Download Oculus Runtime
First things first, you absolutely need the Oculus Runtime. This is the core software that allows your computer to communicate with the DK2. Think of it as the driver for your VR headset. You’ll want to head over to the Oculus developer website (or an archive if you’re doing this in the future, since Oculus doesn’t officially support the DK2 anymore) and find the appropriate runtime version for the DK2. Make sure you get the right one, or things might not work as expected. Once you’ve found it, download the installer. It’s usually a pretty big file, so grab a coffee while you wait.
Install the Software Development Kit
Next up is the Software Development Kit, or SDK. This isn’t strictly required for running existing VR experiences, but it’s super helpful, especially if you plan on doing any kind of development or advanced configuration. The SDK includes tools and libraries that developers use to create VR applications. Even if you’re not a developer, it often comes with useful utilities and examples. The installation process is pretty straightforward; just run the installer you downloaded and follow the prompts. Make sure to pay attention to where it installs, as you might need to access those files later. You might need to find an archived version of the Oculus SDK online, since the DK2 is an older piece of tech.
Explore Initial Demos
Okay, you’ve got the runtime and SDK installed. Now for the fun part: trying out some demos! The Oculus SDK usually comes with a few basic demos to get you started. These are simple VR experiences designed to show off the capabilities of the DK2. Look for them in the installation directory of the SDK. Running these demos is a great way to verify that everything is working correctly and to get a feel for what VR is all about. If the demos run smoothly, you’re in good shape. If not, it’s time to do some troubleshooting. Here are some demos you might find:
- Oculus World Demo
- Tuscany Demo
- VR Cinema
Getting the software set up correctly is half the battle. Don’t skip steps or rush through the installation process. A little patience now will save you a lot of headaches later. If you run into any problems, the Oculus developer forums (or archived versions of them) are a great resource for finding solutions. Good luck, and have fun exploring the world of VR!
Configuring Display Preferences
This part is important. Getting your display settings right can make or break your VR experience with the DK2. It’s not always plug-and-play, so let’s walk through the key steps.
Set Oculus as Main Display
Sometimes, the Oculus isn’t automatically recognized as the primary display. You might need to manually set it in your operating system’s display settings. This ensures that VR applications render correctly on the headset. If you don’t, you might see the VR view on your monitor instead of inside the headset, which isn’t what we want. I’ve had this happen to me a few times, and it’s always a facepalm moment when I realize I forgot this step.
Utilize Oculus Config Utility
The Oculus Configuration Utility is your friend. It allows you to fine-tune various settings, including display mode and IPD (Inter-Pupillary Distance). Make sure you download the Oculus runtime for the DK2.
Here’s what you can adjust:
- Display Mode: Choose between Direct and Extended mode. Direct mode generally offers better performance and compatibility.
- IPD: Adjust this to match the distance between your pupils for a clearer image. A wrong IPD can cause eye strain and a blurry picture.
- Firmware Updates: Keep your DK2 firmware up to date for the best experience.
It’s worth spending some time experimenting with these settings to find what works best for you. Everyone’s eyes are different, and the ideal configuration can vary.
Adjust Resolution and Rotation
Getting the resolution right is key for a sharp VR image. The DK2 has a specific native resolution, and running it at a different resolution can lead to distortion or performance issues. Also, make sure the rotation is set correctly so the image isn’t upside down or sideways. I remember one time I forgot to set the rotation, and everything was tilted – it was a very disorienting experience!
Here’s a quick guide:
- Check Native Resolution: Find the DK2’s native resolution (usually 1920×1080 per eye).
- Set Resolution: In the Oculus Configuration Utility or your graphics card control panel, set the resolution to match the native resolution.
- Adjust Rotation: If the image is rotated, use the utility to correct it. Common settings are 0, 90, 180, and 270 degrees.
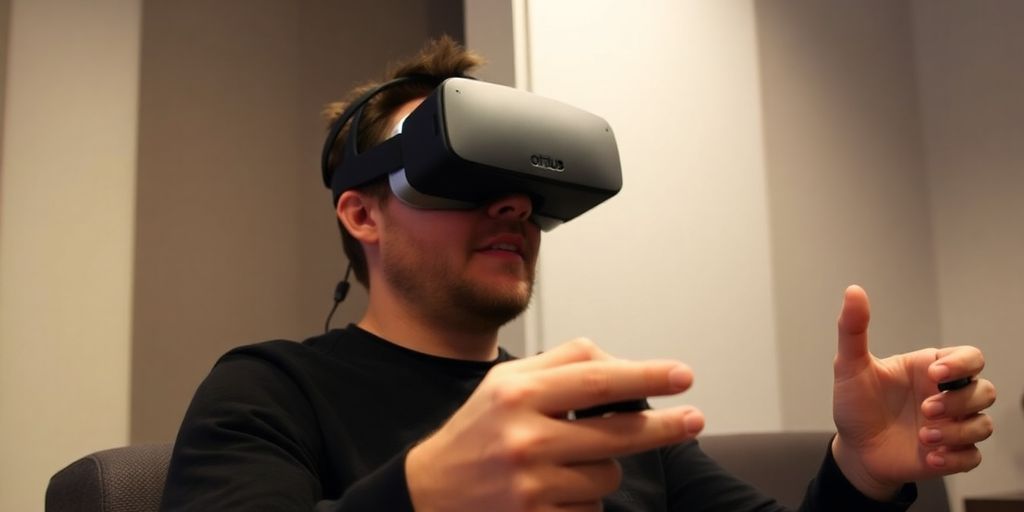
Headset Physical Setup
Alright, let’s get the DK2 physically set up. This part is all about making sure everything is connected right and that the headset is comfortable. It’s not rocket science, but a few key things can make a big difference in your VR experience.
Secure Cable Connections
First things first, let’s talk cables. The DK2 has a few different connections that all need to be snug and secure. You’ve got the HDMI cable for video, the USB cable for data, and the power adapter (if you want to use the USB accessory port on the headset). Make sure each of these is firmly plugged into both the headset and your computer. A loose connection can cause all sorts of weird issues, from video dropouts to tracking problems. I usually give them a little wiggle test after plugging them in, just to be sure. Also, make sure the cable has enough slack so you can move around without pulling on the connections. You don’t want to accidentally yank something out mid-game!
Ensure Clear LED Sensors
The DK2 uses external sensors to track your head movement, so it’s important to make sure these sensors have a clear line of sight to the headset. This means no obstructions! Keep the area in front of the sensors clear of anything that might block the signal. Things like books, toys, or even just a messy desk can interfere with tracking. I like to position the sensor about 5 feet away from where I’ll be standing or sitting, right in front of me. This seems to give the best results. Also, make sure the sensor is stable and won’t get bumped or moved during use. A wobbly sensor is a recipe for a shaky VR experience.
Proper Lens Selection
The DK2 comes with two sets of lenses, designed for different levels of nearsightedness. The ‘A’ set is for moderately nearsighted or normal vision, while the ‘B’ set is for very nearsighted users. The A set comes pre-installed. If you wear glasses, stick with the ‘A’ lenses and adjust the side screws on the headset to create more room. Don’t wear bifocals with the headset. To swap the lenses, use the insert-turn and lock mechanism. Also, keep the lenses clean. Avoid scratching the Oculus Rift CV1 lenses and keep them free of dirt and smudges.
Before you dive into VR, take a moment to clear your play area. Remove any obstacles that could cause you to trip or bump into things. It’s also a good idea to let people around you know that you’ll be immersed in a virtual world, so they don’t accidentally walk into your space. Safety first!
Understanding Virtual Reality Basics
Immersive Visual Experience
Okay, so what’s the big deal with VR? It’s all about tricking your brain into thinking you’re somewhere else. The goal is total immersion, where the digital world feels as real as the one around you. This is achieved through stereoscopic 3D visuals, head tracking, and a wide field of view. It’s more than just watching a movie; it’s like stepping inside one.
Object Manipulation in VR
Being able to see a virtual world is cool, but it gets way better when you can interact with it. Think about reaching out and grabbing a virtual object, throwing a ball, or even just pushing buttons on a control panel. This is where things like hand tracking and controllers come in. The more natural the interaction, the more believable the experience. Here are some common ways to interact:
- Controllers: Standard input devices for basic interactions.
- Hand Tracking: Using cameras to track your hand movements directly.
- Haptic Feedback: Devices that simulate touch and resistance.
Navigation Within Virtual Environments
So, you can see and touch stuff, but how do you move around? This is where navigation comes in. It’s not as simple as walking around your room because you’ll quickly run into a wall. There are a few common solutions:
- Teleportation: Point and click to instantly move to a new location.
- Artificial Locomotion: Using a joystick or touchpad to simulate walking or running.
- Room-Scale VR: Defining a physical space that corresponds to the virtual environment.
The key to good VR navigation is minimizing motion sickness. This means matching your visual movement with your physical sensations as closely as possible. If there’s a disconnect, your brain gets confused, and that’s when the nausea kicks in. Experiment with different methods to find what works best for you. You can find more information about virtual reality online.
Optimizing Performance for Mac Users
Let’s be real, getting the Oculus Rift DK2 to run smoothly on a Mac can be a bit of a challenge. Macs weren’t exactly designed with VR gaming in mind, so you might need to tweak a few things to get the best experience. Don’t worry, it’s totally doable! This section will walk you through some key areas to focus on.
Graphics Card Considerations
Okay, this is the big one. Your Mac’s graphics card is probably the most important factor in VR performance. Older Macs, especially laptops, often have integrated graphics or older dedicated cards that just can’t handle the demands of VR. Check your Mac’s specs to see what graphics card you have. If it’s below the recommended specs for the Oculus Rift DK2, you might struggle to get a smooth frame rate. You might want to consider best 360 players to watch VR videos if your Mac can’t handle VR games.
Managing External Monitors
Having multiple monitors connected to your Mac can sometimes impact VR performance. The system has to render images for all those displays, which can take away resources from the VR headset. Try disconnecting any external monitors before launching your VR experience to see if it makes a difference. Some users have found that mirroring the display to the Oculus helps, but your mileage may vary. Switchresx app can also help disable the primary screen.
Achieving Optimal Frame Rates
Frame rate is king in VR. A low frame rate can lead to motion sickness and a generally unpleasant experience. Here are a few things you can try to boost your frame rate:
- Lower the resolution in the Oculus configuration utility. This will reduce the load on your graphics card.
- Close any unnecessary applications running in the background. The fewer programs competing for resources, the better.
- Adjust the graphics settings in your VR games and applications. Turn down details like shadows, textures, and anti-aliasing.
It’s worth noting that some older Mac models might simply not be powerful enough to run certain VR experiences smoothly, regardless of what tweaks you make. Be prepared to adjust your expectations and focus on less demanding VR content.
Here’s a table showing the impact of different settings on frame rates (example):
| Setting | Impact on Frame Rate | Notes |
|---|---|---|
| Resolution | High | Lowering resolution can significantly improve frame rate. |
| Texture Quality | Medium | Reducing texture quality can provide a noticeable boost. |
| Shadow Quality | High | Shadows are resource-intensive; turning them off helps a lot. |
| Anti-Aliasing | Medium | Can smooth edges but also impact performance; try turning it down. |
Launching Your First VR Experience
Starting Demos and Applications
Alright, you’ve made it this far! Time to actually use your DK2. The first step is finding something to run. There are tons of free demos and applications out there, and many are specifically designed to show off what VR can do. Start with something simple and well-reviewed to avoid immediate frustration.
- Check the Oculus Share platform (if it’s still around) for community-created content.
- Explore SteamVR for compatible games and experiences.
- Look for demos specifically designed for the DK2; some newer VR content might not be fully compatible.
Configuring Game Settings
Once you’ve picked a demo, you’ll probably need to tweak some settings. VR can be demanding on your system, so don’t be afraid to dial things down. Here’s what to look for:
- Resolution: Start at 1080p and adjust upwards if your system can handle it. Remember, each eye needs its own image, so it’s more taxing than regular gaming.
- Refresh Rate: Try to match the refresh rate of your DK2 (60Hz or 75Hz). Some older games might only support 60Hz.
- Graphics Settings: Reduce shadows, anti-aliasing, and other intensive effects if you’re experiencing lag. Report problem if an app isn’t launching correctly.
It’s a good idea to experiment with different settings to find the sweet spot between visual quality and performance. Don’t be afraid to restart the game multiple times to test different configurations.
Troubleshooting Common Issues
VR can be finicky, so expect to run into some problems. Here are a few common ones and how to fix them:
- Image is distorted or blurry: Adjust the lens separation using the slider on the bottom of the DK2. Make sure the headset is positioned correctly on your head.
- Tracking is lost: Ensure your camera is properly positioned and that there are no obstructions in its field of view. Good lighting is also important.
- Game isn’t displaying in the headset: Make sure the DK2 is set as your primary display. In SteamVR, double-check that the game is set to launch in VR mode. Some games may require you to choose “Play with Oculus Rift”.
And if all else fails, Google is your friend! There’s a huge community of VR enthusiasts out there who have probably encountered the same problems you’re facing. You can even try guided meditation to calm your nerves!
Wrapping Things Up
So, there you have it. Getting your Oculus Rift DK2 up and running might seem like a lot at first, but if you take it step by step, it’s totally doable. We covered everything from plugging in cables to getting the software just right. It’s pretty cool to see how far virtual reality has come, even with these early kits. Now that you’ve got your DK2 ready, you can start checking out all the demos and experiences out there. Have fun exploring those new worlds!
Frequently Asked Questions
What exactly is the Oculus Rift DK2?
The Oculus Rift DK2 is a special headset that lets you step into a computer-made world. It’s like putting on goggles that show you a 3D picture that moves as you move your head, making you feel like you’re really there.
Why is it called a ‘Development Kit’?
The DK2 is a ‘Development Kit.’ This means it was made for people who wanted to create games and apps for virtual reality. It helped them test their ideas before the final version of the Oculus Rift came out.
Is it hard to set up the DK2?
Setting up the DK2 can be a bit tricky because it was an early version. You need to install special programs, plug in several cables, and adjust settings on your computer to make sure everything works together smoothly.
Do I need special software to make it work?
Yes, you need to download the Oculus Runtime and, if you plan to build things, the Software Development Kit (SDK). These are like the basic tools that make the headset understand what your computer is telling it.
What kind of computer do I need for the DK2?
The DK2 needs a strong computer, especially one with a good graphics card, to show you smooth virtual worlds. If your computer isn’t powerful enough, the experience might be choppy or blurry.
What does ‘virtual reality’ mean when I’m using the DK2?
Virtual reality lets you look around a digital space just by turning your head. You can also interact with things in that space, like picking up objects or moving through different areas, making it feel very real.
146 Responses to Getting Started with Your Oculus Rift DK2: A Comprehensive Setup Guide